
Now I am completely sold to AVR microcontrollers. ATMEL’s free software seamlessly interfaces to the also free AVR-GCC C compiler and it is really easy to get started with the AVR microcontrollers – both in assembler and in C.
Today I first rewrote yesterday’s assembler code into C in order to get the same effect. I even dared to spice it up a bit with a timed delay instead of 16-bit count down between steps:
// UZ 2010-05-16
#define F_CPU 1000000UL // 1 MHz
#include <avr/io.h>
#include <util/delay.h>
uint8_t count;
int main(void)
{
DDRB = 0xff;
count = 0;
while (1)
{
PORTB = count;
_delay_ms(1000);
count ++;
}
}
The I played around a bit – and my second code to test was the infamous scanning LED lights from the engine hood of KITT (ie the sapient car) in Knight Rider.
// UZ 2010-05-16
#define F_CPU 1000000UL // 1 MHz
#include <avr/io.h>
#include <util/delay.h>
uint8_t count;
uint8_t up;
int main(void)
{
DDRB = 0xff;
count = 1;
up = 1;
while (1)
{
PORTB = count ^ 0xff;
_delay_ms(100);
if (up==1)
{
if (count < 128)
{
count = count << 1;
}
else
{
up = 0;
}
}
else
{
if (count >1)
{
count = count >> 1;
}
else
{
up = 1;
}
}
}
}
[flashvideo file=http://www.sciencetronics.com/greenphotons/wp-content/uploads/2010/05/IMGP9283.mp4 title=”Knight Rider is back” /]
These code examples are by no means optimized or meant as good examples. I just want to point out that after years of waiting and hesitating getting started form zero to something is just a matter of a few hours with AVR microcontrollers.
I recently found four character LCD displays Seiko L1614 in the electronics trash. Never thought I would be able to use these for something – but with 4 lines 16 characters each I also thought they were to precious to just be thrown away.
It took me a while (let’s say the better part of two hours) to get my AVR to speak to an LCD display. There are several LCD code libraries around, but sadly most of those lack documentation. So if you want to get your LCD running on an AVR I can only recommend Peter Fleury’s lcdlibrary.
Since this might also not be trivial to get running, here is how it is done:
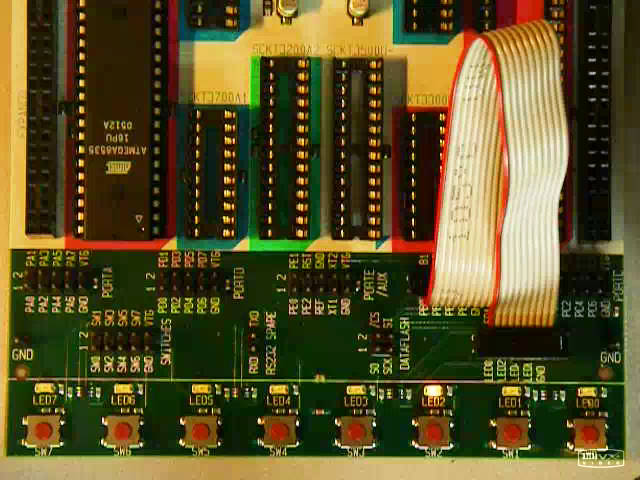
- connect your LCD to one port of your microcontroller. In order to do this on an STK500 I used the 10-wire flat ribbon cable including pin-head connector from an old RS232 port connector – these were very common when RS232 ports were found on mulit-IO cards for PCs. I still have a couple of those lying around… Connect the control lines (RS, R/W, E) of the LCD and the upper 4 data bits (DB4-7). Also connect the power supply GND and VTG and the contrast voltage with an adjustable resistor between GND and VTG. You can choose a different wiring, but this is the one which I use:
LCD terminal STK500 1 GND 9 GND 2 Vcc 10 VTG 3 Vcontrast wiper of 10k variable resistor
between VTG and GND4 RS 1 Px0 5 R/W 2 Px1 6 E 3 Px2 nc 4 Px3 7 DB0 nc 8 DB1 nc 9 DB2 nc 10 DB3 nc 11 DB4 5 Px4 12 DB5 6 Px5 13 DB6 7 Px6 14 DB7 8 Px7 - download and unpack the file lcdlibrary.zip from Peter Fleury’s hoempage to some archive directory on your system, since you will probably need it more than once
- copy the files lcd.c and lcd.h to your current AVRStudio-project’s main directory
- edit the file lcd.h to reflect your hardware setup. In my case I had to make some changes:
// for the clock frequency I currently use
#define XTAL 1000000 /**< clock frequency in Hz, used to calculate delay timer */
// for the Seiko L1614 4x16 display
#define LCD_LINES 4 /**< number of visible lines of the display */
#define LCD_DISP_LENGTH 16 /**< visibles characters per line of the display */
#define LCD_LINE_LENGTH 0x40 /**< internal line length of the display */
#define LCD_START_LINE1 0x00 /**< DDRAM address of first char of line 1 */
#define LCD_START_LINE2 0x40 /**< DDRAM address of first char of line 2 */
#define LCD_START_LINE3 0x10 /**< DDRAM address of first char of line 3 */
#define LCD_START_LINE4 0x50 /**< DDRAM address of first char of line 4 */
#define LCD_WRAP_LINES 0 /**< 0: no wrap, 1: wrap at end of visibile line */
//for my wiring
#define LCD_PORT PORTC /**< port for the LCD lines */
#define LCD_DATA0_PORT LCD_PORT /**< port for 4bit data bit 0 */
#define LCD_DATA1_PORT LCD_PORT /**< port for 4bit data bit 1 */
#define LCD_DATA2_PORT LCD_PORT /**< port for 4bit data bit 2 */
#define LCD_DATA3_PORT LCD_PORT /**< port for 4bit data bit 3 */
#define LCD_DATA0_PIN 4 /**< pin for 4bit data bit 0 */
#define LCD_DATA1_PIN 5 /**< pin for 4bit data bit 1 */
#define LCD_DATA2_PIN 6 /**< pin for 4bit data bit 2 */
#define LCD_DATA3_PIN 7 /**< pin for 4bit data bit 3 */
#define LCD_RS_PORT LCD_PORT /**< port for RS line */
#define LCD_RS_PIN 0 /**< pin for RS line */
#define LCD_RW_PORT LCD_PORT /**< port for RW line */
#define LCD_RW_PIN 1 /**< pin for RW line */
#define LCD_E_PORT LCD_PORT /**< port for Enable line */
#define LCD_E_PIN 2 /**< pin for Enable line */ - then you have to add lcd.c as additional source file to your AVRStudio project. This is done in the left panel of the standard work space in AVRStudio under “Source files”
- in your own source code you will have to add the line
#include "lcd.h"


This is a great post, I stumbled across your story while looking for Song Lyrics. Thanks for sharing, I’ll be sure to come back.
“Now I am completely sold to AVR microcontrollers”
Another one 🙂
Now, the only thing you need to add is a speaker, and play this song in a loop: http://www.youtube.com/watch?v=r1MdpahtL1Q 🙂
Przypuszczalnie jestes’ w mocy mi pomóc: tworze; blog: jakkolwiek na inny temat, jednakz.e nie to jest konkretem poniz.szego pytania: wielki problem mam ze spamem i nijak nie umiem sobie z tym poradzic’… Zauwaz.y?em, z.e ten blog jest schludny i najwidoczniej nie masz tego problemu. W jaki sposób to robisz? Z góry dzie;kuje; za echo na Twoim blogu. BTW: bardzo fajna stronka 🙂
I awoid beeing spammed by moderating comments….
Hi… Thank you for the article it was really informative and exactly what i was searching for. Thank you for sharing great information.
Great blog, Just wanted to comment that i can not connect to the rss stream, you might want install the right wordpress plugin for that to workthat.